

Every week, we get calls and emails from customers who have used our wildlife food plot soil test kit. Usually folks are calling because they want help interpreting the results or they’d like recommendations for fertilizers based on the results. Even if you haven’t used our soil test kit, maybe you’re just curious about what information is included when you perform a soil test.
If any of these apply, then this blog article is just for you. This is a long one folks, but that’s because it’s filled with useful information! Stick it out and you’ll be a pro at understanding your soil test results!
Why is it important to get a soil test?
If you’ve been following our blog articles, then you’ve probably noticed that we mention how important it is to get a soil test before you plant (and certainly before you fertilize!). Plain and simple: soil tests are the only way to know what’s going on in your soil! Without a soil test, you can’t know how much to fertilize or lime your soil – or if you even need to.
A common myth is that you can tell the “fertility level” or “the amount of lime you need” for your soil based on the color. If it’s nice and black, it’s healthy plant soil and it’s good to go! Unfortunately, that’s absolutely false. The color of your soil is dependent on a lot of factors – not all of which have to do with fertility level or lime requirements. Again, a soil test is going to tell you exactly what you need, rather than guessing based on nebulous parameters like soil color.
What happens if I over- or under-fertilize?
Without a doing a soil test, you can be over- or under-applying nutrients and you’d never know until the situation becomes serious. This can have detrimental effects on both your crops and your soil quality.
In the case of wildlife food plots, the most common mistake is to over-fertilize. A lot of hunters and growers forget they aren’t growing crops at production agriculture levels, so they fertilize every year before planting a food plot, and they don’t get soil tests done to make sure they actually need it.
The amount of nutrients needed to grow crops for grain or vegetable production are much higher than to grow crops for forage use by wildlife. Over time, this over-application of fertilizer and/or lime can detrimentally affect the growth of your food plot crops by negatively affecting nutrient uptake in the plants and raising the pH of the soil to inhospitable levels. Plus, you may be contributing to runoff pollution and you’re definitely throwing money down the drain on unnecessary inputs.
What will the Deer Creek Seed food plot soil test kit tell me?
When you use our wildlife food plot soil test kit, you’ll be given basic fertilization recommendations for the most common limiting nutrients: Nitrogen, Phosphorus, and Potassium (also known as the primary macronutrients). Additionally, you’ll see your soil’s pH level with recommended lime requirements if your soil needs it.
The most common questions we get about soil fertility include topics like how to check soil pH, what kinds of fertilizers to use (and how much), and whether or not someone should use lime. We’re going to answer those questions in this article by using the results for a soil test on a food plot that I just dug up for the first time this year!
(Ruth’s new farm - in a break between storms!)
A little background on Ruth’s food plot.
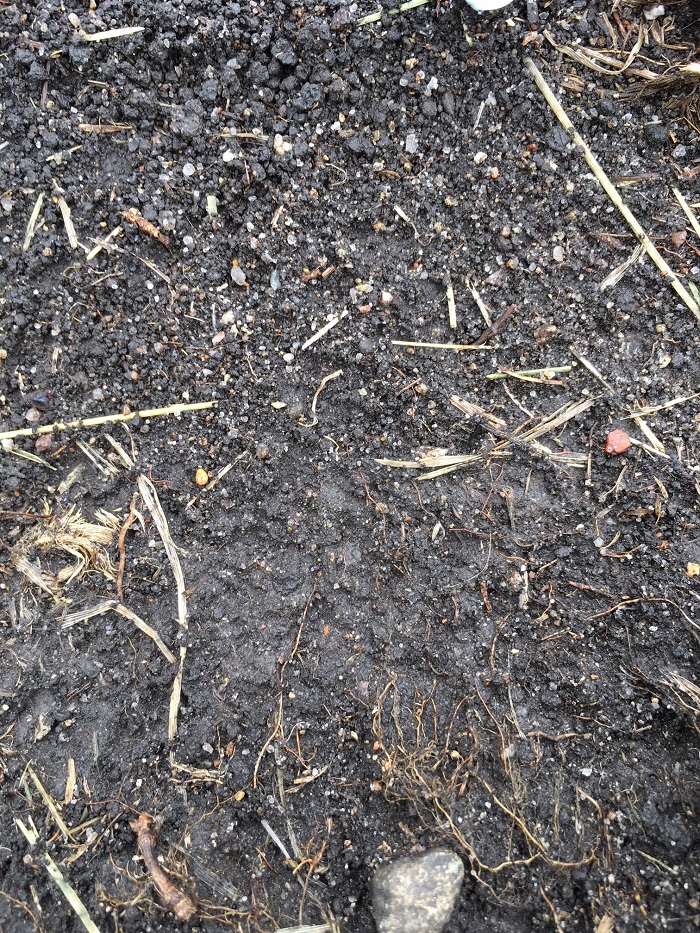
This past spring, I moved out to a small farm in east-central Iowa. The farm is about 5 acres, surrounded by rolling hills, drainage ravines, public hunting forests, and some cropland. On the edge of my property is a flat spot that abuts a hay buffer strip and a forested ravine. Since I saw a lot of deer sign around that part of the property, I decided to dig up a small strip and put in a basic food plot. Perhaps I can entice a doe or two to come into the property this fall!
The folks who lived here before had lawn everywhere – I think they really liked mowing! This food plot was also lawn before I tilled it up (remember this tidbit, it becomes really important when I’m interpreting my soil test results.) After prepping the area, the food plot is about 2,000 square feet – small, long, and narrow – but perfectly enticing for a doe who’s slipping through a forested, gently-sloped ravine.
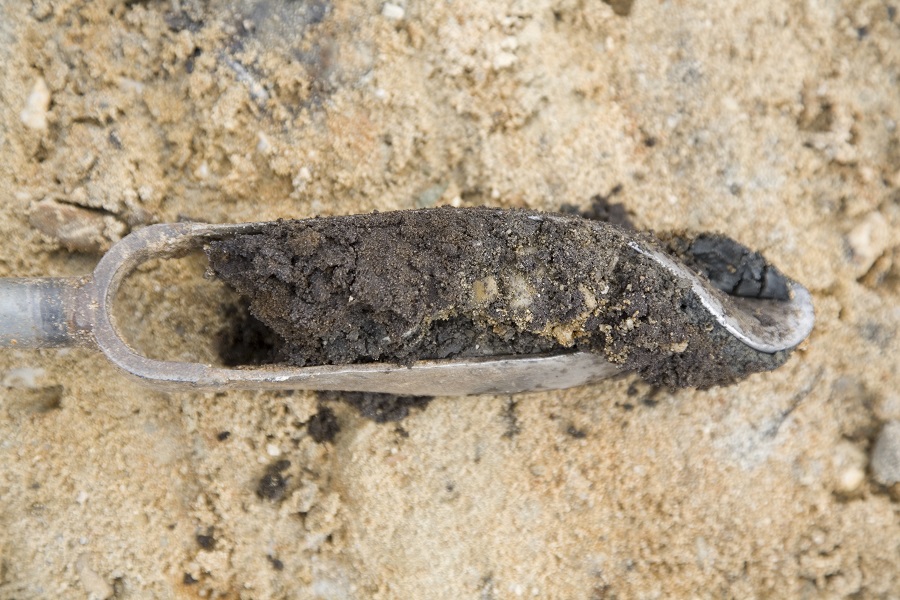
Two weeks ago, I went out and performed a soil test on the plot using Deer Creek Seed’s wildlife food plot soil test kit. If you need guidance on how to collect soil for a soil test, check out this great tutorial that will walk you through the process.
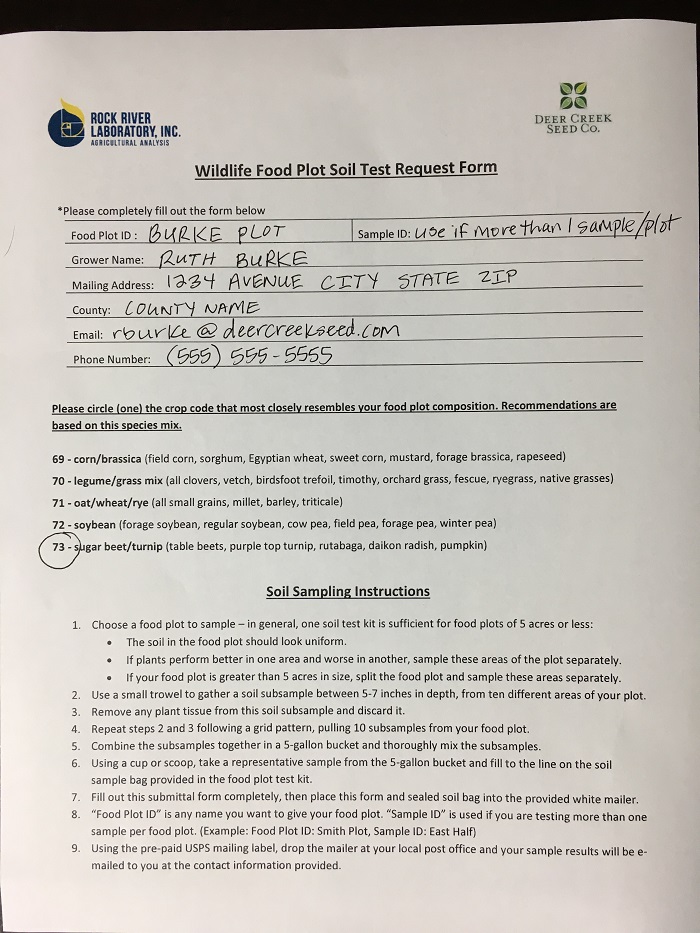
Our test kit comes with an instruction sheet that you mail along with your soil sample (see my instruction sheet above). There are five basic food plot codes that you can choose from based on the nutrition needs of those crop groups.
Because I’ll be planting the Beets & Sweets mix this year, I chose the food plot code “73” for beets and turnip combinations. I mailed my soil sample and the information sheet into the laboratory and I received my test results (below) a week later. Let’s take a look at them!
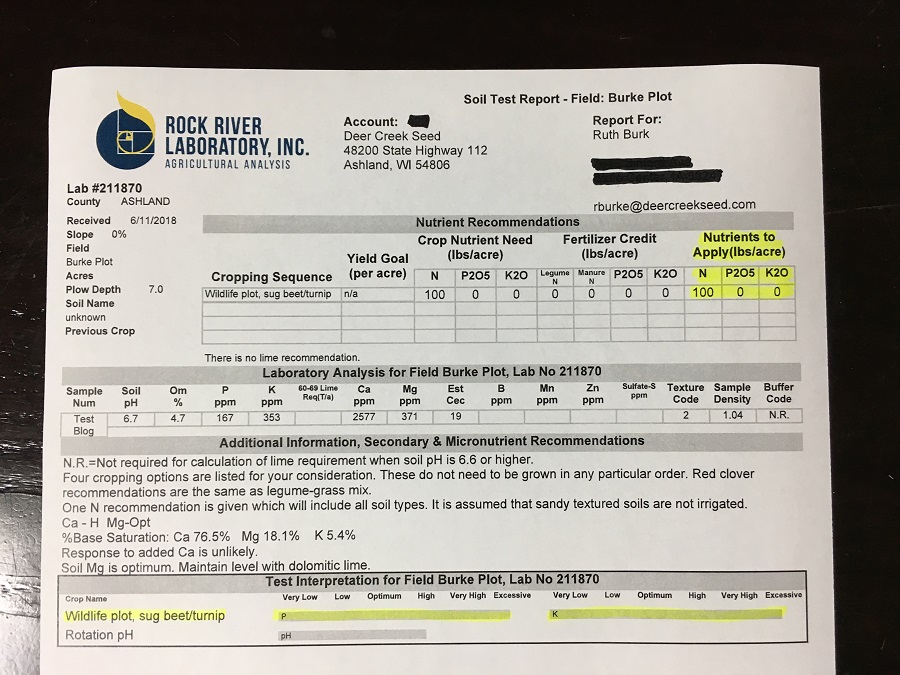
(Ruth’s soil test report – nutrient recommendations highlighted in yellow)
There’s a lot here – what is the most important stuff?
There are four main sections on our soil test report. “Nutrient Recommendations” is the top section, “Laboratory Analysis” and “Additional Information” are the middle sections, and “Test Interpretation” is the bottom section. For most people, the top and bottom sections are probably the most valuable, and if their pH is too high or too low, then the middle sections become important.
Top section and bottom section – what does Ruth’s plot need for fertilizer?
Take a look at my soil test results and you’ll see that I highlighted a few areas in yellow. In the top section, I highlighted the last column, “Nutrients to Apply (lbs/acre).” This column is the column you should use for the estimates of nutrient quantities that you need to apply to your food plot. Note that I say “estimates” here. These recommendations are not gospel! You can be a little under or a little over and be just fine.
The first column in this section lists the total quantities that your food plot needs, the second column accounts for any fertilizer credits you may get from legumes or manure, and the third column gives you the adjusted total that you should apply. Note, these columns are for pounds (lbs) per ACRE. Make sure you do the backwards math if your food plots are less than an acre in size (I’ll go through the math when calculating what my food plot needs.)
What does N, P2O5, and K2O stand for? Those stand for the commercially available forms of each primary macronutrient in most bagged fertilizers: elemental nitrogen (N), phosphorus (in the form of phosphate), and potassium (in the form of potash). When you go to the store and purchase bagged fertilizer, perhaps you’ve seen a series of three numbers listed on the front of the bag, like 10-10-10? These numbers indicate that the contents of this bag contain 10% elemental N, 10% phosphate-P, and 10% potash-K.
Our soil test is really nice because it converts elemental P and K requirements for you! That removes an extra step when purchasing fertilizer from the store – you know exactly the amount of P2O5 and K2O that you need, instead of having to do the math to convert elemental P and elemental K into commercial fertilizer values.
So, what do my test results indicate? I need 100 pounds per acre of nitrogen and I don’t need any phosphorus or potassium. Now, this struck me as pretty funny. We’re talking about a patch of lawn that hasn’t been farmed in over 50 years (and maybe longer). Conceivably, it hasn’t been fertilized in that amount of time either – I mean, why bother, right? If you’re not growing food or grain, why fertilize? Well, boy was I wrong!
Take a look at the bottom section of the test report – at the second area where I highlighted in yellow. These shaded bars interpret my soil P and K levels. As you can see, they are both excessively high. If you really want to wade into the weeds here, take a look at the “Laboratory Analysis” section in the middle of the report. You’ll see that my P and K ratios (in parts per million) are at 167 and 353, respectively. Now, I won’t go into details on what these values mean except to say that (in general) P and K values for vegetable production shouldn’t exceed 75 and 250 ppm, respectively. My values far exceed those numbers. And those values are for vegetable farmers! I’m not even planting seeds to harvest crops. So, I need even less.
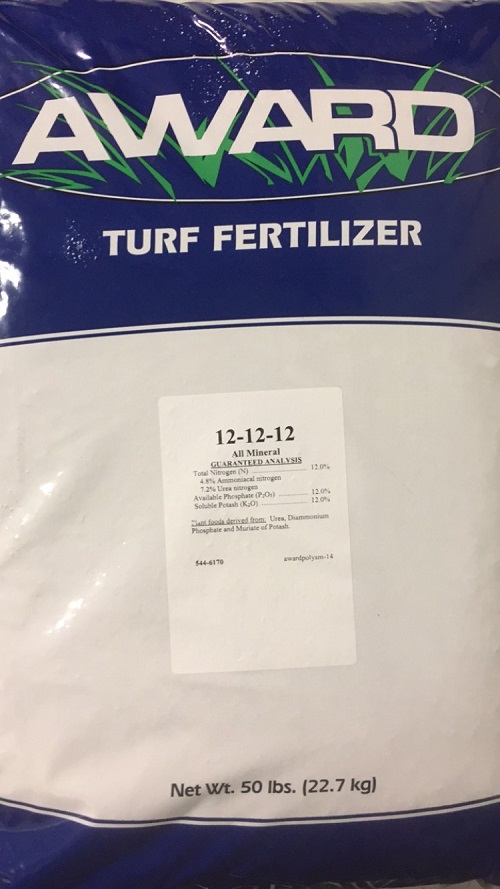
There’s a very good chance that the previous owners probably fertilized their lawn every year with turf fertilizer without getting a soil test first. Over time, soil-immobile nutrients like P and K can build up in the soil if they aren’t taken in by plants. Nitrogen, in contrast, is water soluble and therefore very soil mobile, so it makes sense that of the three nutrients, N was the only one that was low.
What implications does this have for my food plot? Well, elevated levels of P won’t necessarily harm plants, but runoff into the nearby creek could be a concern. And elevated levels of K can cause interruption of a plant’s ability to uptake magnesium (Mg) and calcium (Ca) – two other macronutrients that are important to plant growth. I will be taking pictures of the food plot as the summer wears on because I’m curious to see if the plants will develop Ca or Mg deficiencies due to the excessive amount of K in the soil.
Ruth’s plot is less than an acre – how much N does she need and where can she buy it?
My plot has an area of 2,000 square feet (20 feet by 100 feet). An acre has an area of 43,560 square feet. So, if I need 100 lbs of N per acre, then for my little food plot, I’m actually going to need 4.6 lbs of N.
Ex: 2,000 sq. ft. / 43,560 sq. ft. x 100 = 4.6%
4.6% x 100 lbs = 0.046 x 100 = 4.6 lbs of N
In my case, I’m going to go to the local agricultural cooperative in my area and buy a small amount of bagged urea, which has a fertilizer analysis of 46-0-0. This means that the granular fertilizer in the bag is 46% N, and 0 % P and K.
Conveniently, if I purchase 10 lbs of the bagged urea, I will be getting 4.6 lbs of actual N. The rest of the weight in the bag is filler material to help spread the fertilizer. I will also be using a product to reduce volatilization (urea is infamous for that) and I’ll be incorporating it in to the soil immediately – preferably right before a rain!
Ex: 46% x 10 lbs = 0.46 x 10 = 4.6 lbs of N
What if you need N, P, and K inputs?
So, what happens when you also need P and K? Just for an example, let’s say that your soil test report says that you need to apply 50 lbs N, 40 lbs P2O5, and 50 lbs K2O. And let’s say that your food plot is roughly a half-acre in size. So, you would need to apply 25 lbs of N, 20 lbs of P2O5, and 25 lbs of K2O.
Depending on where you live, you can get basic fertilizer at your local garden center, agricultural cooperative, feed & seed store, country store, or farm supply store. Let’s say that your local garden center has a bagged fertilizer with a guaranteed analysis of 10-10-10. This means that the fertilizer is 10% N, 10% P2O5, and 10% K2O. If you purchase 500 lbs of this fertilizer, you’ll have 50 lbs of each nutrient. But that means you’ve gone over on your P requirement, and you had to buy 500 lbs! You could buy 300 lbs of a 14-14-14 fertilizer and that would get you closer to what you need – 42 lbs of each nutrient.
You will have to play around with numbers to find the fertilizer with an analysis that is easily scaled up to suit what you need. Keep in mind, these nutrient recommendations in the soil test report are not hard-and-fast rules. They are suggested guidelines and as long as you’re close to them, your food plot will be fine. In this scenario, I’d buy 300 lbs of the 14-14-14 and call it day!
It may be beneficial to check with your local agricultural cooperative or county Extension office to get some help if you’re having difficulty finding a bagged fertilizer at the nearby farm or country stores. We would give you recommendations in this blog article for fertilizer sources and types, but this will change depending on your state and location in the U.S.
We definitely recommend that you check with a local agricultural cooperative or county Extension office if you need single nutrients only. There are sources of single nutrient fertilizers (like urea in my case), but these are a little rarer and easier to find at places that specialize in selling agricultural inputs. These same places can give you recommendations on mixing single sources of fertilizer as well as giving you guidance on applying all kinds of fertilizers, in case you are purchasing a fertilizer product that requires special application methods.
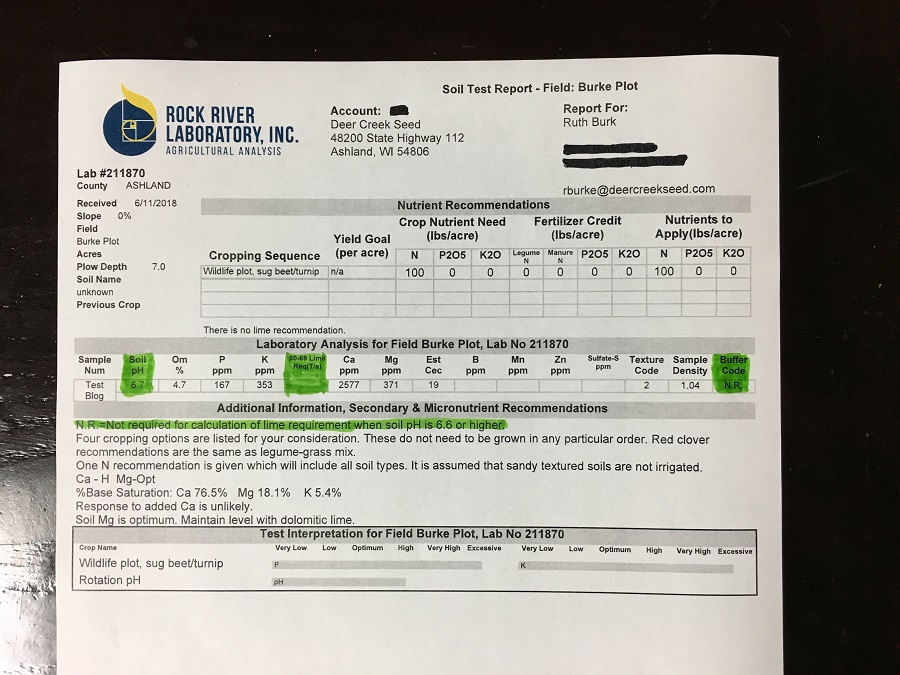
(Ruth’s soil test report – pH information highlighted in green)
What about Ruth’s soil pH? Does she need to lime her food plot’s soil?
Take a look at my soil test report again (above) where I’ve highlighted a few things in green. In the middle section, you’ll see that my soil pH is 6.7 and my lime requirement is empty. All the way at the end of the section, you’ll see an N.R. in the box for “buffer code.”
Soil pH is the measure of active acidity or alkalinity in the soil (whether the soil is acidic or basic, respectively). The buffer code is your soil’s buffer pH, or the reserve/potential acidity. The buffer code really comes into play if you already have a soil with a pH that is too low or too high. Essentially, the buffer code indicates how “difficult” it will be to change the soil pH using inputs – you will need to use more inputs to change the pH depending on the buffer code. There’s a bit of math that goes with this calculation but luckily for us, our soil test report does the math for you!
If your pH is too low, there will be a lime requirement listed in tons per acre. If your pH is too high, our soil test will give recommendations for lowering it as well. Because I don’t need to alter my soil pH, I don’t have a lime requirement or a suggestion for lowering it.
The goal for pH is to have it somewhere near neutral, or a little lower than neutral (like 6.7!) If the pH is too low or too high, the chemical reactions in the soil may (and often will) prevent plants from taking in certain nutrients through their roots. You may have an adequate amount of nutrients in the soil, but if your pH is too low or too high, those nutrients won’t be accessible to the plants. They’ll be “tied up” in chemical reactions in the soil.

Okay, but what if you DO need to apply lime? Where can you get it and how much will you need?
So, I’m sure you’re already thinking, “It’s great that you don’t need lime, Ruth, but I DO need lime – my pH is too low. So, what do I do?” And that’s where the “Lime Requirement” in the “Laboratory Analysis” section comes in. This soil report assumes that you will be using “60-69” grade lime. This is a coarser form of lime that is much cheaper, but also takes longer to react in the soil than finer, higher grade lime.
Before we go any further here, we need to emphasize that no matter the grade of lime you apply, it takes much longer to react in the soil than applying fertilizer. As in: it takes several months or even years to fully react and raise your pH. So, it’s really best to test your soil the year before you intend to put in a food plot so that you can treat your soil with lime far enough in advance that the lime has time to take effect.
The same goes for lowering your pH if it’s too high. There are several sulfur products that folks typically use to lower their pH and many of them require additional time to fully react in the soil. So, it’s best to test your soil far enough in advance that you have time to apply these kinds of amendments.
Okay! Now for an example. Let’s say that your pH is on the lower end and the soil test report recommends that you apply 2 tons per acre of 60-69 lime in order to raise it. It’s easiest to find lime at your local agricultural cooperative, farm supply store, or country store. If you can find 60-69 lime, then you’re golden! Just make sure to convert the amount you need for the actual acreage that you have in your food plots. In this example, if you only have a half-acre food plot, then you only need 1 ton of lime.
But what if your local Ag. Coop. only has 80-89 lime? Or what if they only have 50-59 lime? Well, there’s a mathematical equation here that you can use to convert the 60-69 recommendation into either 80-89 or 50-59. You “simply” multiply the lime recommendation value you were given by the ratio of the midpoint of the lime grade listed on your report over the midpoint of the lime grade you want to use (lots of words!).
Ex: 2 x 65/85 = (about) 1.5 tons
This means that 2 tons of 60-69 lime is equal to 1.5 tons of 80-89 lime. This makes sense because 80-89 lime is a finer, higher quality grade of lime (which means it reacts a little faster in the soil). It may be more expensive than the 60-69 lime, but you should do the math because you might save more money going with the higher grade of lime if it also means that you have to buy less overall.
The same calculation can be applied to “downgrading” to 50-59 lime but be aware this means you’ll have to buy more lime to achieve the same soil effect, and it will take longer for the lime to react in the soil.
Ex: 2 x 65/55 = (about) 2.4 tons
You’ve seen our soil test. Now it’s your turn!
Phew, there was a ton of information in this blog article! And we really only covered the basics! Your soil test report will potentially have other recommendations, including some micronutrient considerations if things are really off. This article answers basic questions, and for most of our readers, this is enough. But if your report contains additional information you have questions about, feel free to give us a call at our customer service number and we’ll do our best to get you straightened out.
Here are a few final points we’d like to make:
1. Be wary of soil tests offered by companies that also sell high-value fertilizer products – think about this for a second and you’ll realize why we say that. We recommend that you obtain a soil test from an objective source of information – not a company that has interests in selling you fertilizer products. Even though we don’t offer fertilizer products on our website, if you’d rather not buy a soil test kit from us, that’s totally fine! Contact your local Extension office or county NRCS location for more information on a nearby soil test laboratory.
2. The soil test kit we offer is geared towards wildlife food plots. It’s not really meant for garden soil testing or lawn / turf soil testing. Again, your local Extension office will be able to guide you in the right direction if you want to test your garden or lawn soil. And stay tuned to our website, because Deer Creek Seed plans to offer these kinds of soil test kits in the near future!