


The calendar says spring. The sun is out longer, the temperatures are creeping up, and there is a very real temptation to grab a bag of seed and get to work. It happens to nearly every homeowner, every year. The problem is that the calendar and your lawn operate on different schedules — and if you let enthusiasm outrun patience, you can spend real money on seed that simply sits in cold, inhospitable soil, rotting or feeding the birds.
Spring lawn care is not about moving fast. It is about moving in the right order. Done correctly, a spring wake-up routine sets the foundation for everything that follows — healthy roots, strong color, thick turf that crowds out weeds, and a lawn that genuinely needs less from you as the season goes on. This checklist walks through each step in sequence: soil testing first, dethatching second, fertilizing when the timing is right, and seeding last — only when the soil is ready.
Step 1: Test Your Soil Before You Do Anything Else
The single most overlooked step in home lawn care is the soil test. Most homeowners skip it entirely, buy fertilizer based on what's on sale, and wonder why their lawn never quite responds the way they expect. A soil test removes the guesswork. It tells you what your lawn needs, and equally importantly, what it already has in excess.
University of Minnesota Extension recommends testing your soil every three to five years and specifically advises testing in the spring before planting. The results give you a snapshot of your soil's pH, organic matter content, and available phosphorus and potassium levels — the baseline information that should be driving every fertilizer and amendment decision you make.
For turfgrass, soil pH matters more than most homeowners realize. Most commonly grown turfgrasses do best at a pH in the 6.0 to 6.5 range. Outside that window, nutrients can become chemically locked in the soil and unavailable to the plant, regardless of how much fertilizer you apply. If your pH is too low (acidic), lime is the correction. If it is too high (alkaline), sulfur amendments can help bring it down over time.
Michigan State University Extension notes that to collect a proper soil sample for testing, you should take cores from 10 to 15 locations within the area being tested, sampling to a depth of three to four inches for lawns. Collect samples in a zigzag pattern throughout the test area, mix the subsamples together in a clean container, and allow them to air-dry before sending them to the lab. Deer Creek Seed offers soil testing conducted through Rock River Labs.
The practical takeaway: collect your soil samples early in spring while the ground is workable but before you have applied any fertilizer or amendments. Collecting the sample before fertilizer is applied ensures the most accurate possible results. Once you have your results in hand, you will know exactly how much lime (if any) needs to go down — and you can apply it in conjunction with your dethatching work in the next step.
Step 2: Assess and Address Your Thatch
Thatch is the layer of partially decomposed grass stems, roots, and organic matter that accumulates just above the soil surface. A thin layer — up to about a half inch — is beneficial, providing a modest buffer against temperature extremes and moisture loss. When it builds up beyond that, however, it becomes a barrier. Water, air, fertilizer, and seed all struggle to move through a thick thatch layer to reach the soil and root zone where they are needed.
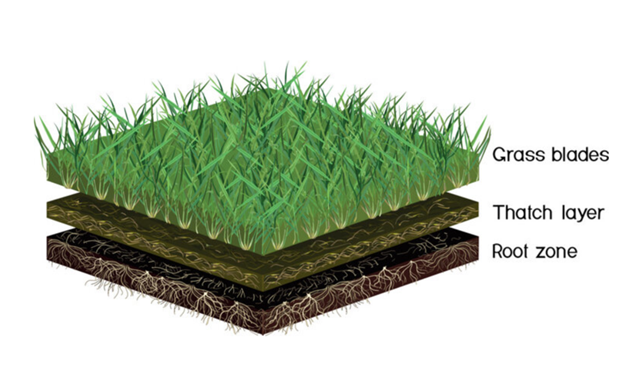 Photo courtesy of Kazakova Maryia | Adobe Stock Images
Thatch decreases the vigor of turfgrasses by restricting the movement of air, water, plant nutrients, and pesticides into the soil. Turfgrass roots that grow into thatch can also become desiccated as the thatch dries. A simple test: push your finger into the lawn. If there is a spongy layer of more than half an inch between the grass and the soil, dethatching is warranted.
Timing your dethatching correctly matters as much as doing it at all. For cool-season grasses in northern climates, the second-best time to dethatch is in the spring — after the second mow of the year, but at least a couple of weeks before air temperatures rise over 75 degrees Fahrenheit. The ideal timing is fall, but spring dethatching is effective when done within this window. Thatch should not be removed during periods of high temperatures or drought, as the turf will not recover quickly under those stresses.
One important consideration before you dethatch: soil pH plays a significant role in thatch buildup and decomposition. When soil pH levels are too acidic — below 5.5 — microbial activity is hindered and thatch builds up more rapidly because there are fewer soil microbes to break it down. This is another reason why soil testing belongs at the front of the checklist. If your pH is low, correcting it will not only help your grass — it will help the soil microbes that naturally decompose thatch between your maintenance events.
After dethatching, rake up and remove the debris. Dethatching frees the soil surface of debris and enhances aeration, overseeding, and fertilization. It is worthwhile to schedule these practices together to save time and maximize the lawn's health — dethatch and aerate before overseeding or fertilizing, as this gives seed and fertilizer better access to the soil layer.
If your thatch layer is under half an inch, skip mechanical dethatching this season. Core aeration alone — pulling small plugs of soil from the lawn — can provide many of the same benefits with less stress to the turf and is generally the better spring practice for most home lawns. Aeration should be performed during cool weather, early to mid-spring or late summer to early fall to facilitate rapid recovery of the grass.
Step 3: Apply Your First Fertilizer — But Wait for the Right Signal
With your soil test results in hand and your thatch managed, fertilizer is the next step. But this is exactly where many homeowners make their most costly mistake of the spring: applying nitrogen too early.
Moderation is key — do not fertilize too much, too often, or too early. Overdoing it in spring can lead to top growth at the expense of root growth, which creates problems as the season progresses. Grass pushed into aggressive shoot growth before its root system has properly re-established is more susceptible to drought stress in summer, more vulnerable to disease, and less competitive against weeds over the long run.
Think of 55°F soil temperature as "go time." This is when cool-season grasses start to wake up in the spring, and when broadleaf weeds such as crabgrass begin to germinate. Fertilizing in sync with this threshold means your grass is actively growing and ready to absorb and use what you're putting down, rather than letting nutrients wash away through the soil profile before the roots are engaged.
The University of Wisconsin-Madison Division of Extension suggests a practical, observation-based rule: wait until you have mowed your lawn twice before applying your first spring fertilizer. May is the target month for most Wisconsin lawns — earlier in the southern part of the state, later to the north. This approach ties your timing to what the lawn is doing rather than the date on the calendar, which is always the more reliable guide.
When it comes to product selection, prioritize slow-release nitrogen. Terms such as controlled-release, slow-release, or slowly available nitrogen all refer to products that release lesser amounts of nitrogen over a longer period, avoiding undesirable surges of growth. Specific examples include sulfur-coated urea, polymer-coated urea, ureaform, and IBDU. Organic fertilizers often contain water-insoluble nitrogen, which is also controlled-release.
A rate of about one pound of actual nitrogen per 1,000 square feet is the suggested target for spring. Dividing 100 by the percent nitrogen listed on the bag gives you how many pounds of product are needed per 1,000 square feet to hit that rate. So, a bag labeled 25-0-10 would require four pounds of product per 1,000 square feet to deliver one pound of actual nitrogen.
One additional note for Midwest homeowners: leaving grass clippings on the lawn to decompose naturally can supply up to 25% of your lawn's yearly nitrogen needs— a meaningful reduction in both your fertilizer budget and your labor.
A Critical Note Before You Seed: Skip the Pre-Emergent
Before moving on to seeding, there is one product decision worth addressing directly — because getting it wrong can set your lawn renovation back by a full season.
Pre-emergent herbicides are highly effective at preventing crabgrass and annual weeds from establishing in spring. Applied at the right time, they form a chemical barrier in the soil that interrupts germination. The problem is that barrier does not discriminate. It will stop crabgrass seed just as effectively as it stops the Kentucky bluegrass, tall fescue, or perennial ryegrass in your Turf Mix.
This is especially important when it comes to "weed and feed" combination products — widely available at garden centers each spring and marketed as a convenient two-in-one solution. Many contain pre-emergent herbicide alongside the fertilizer. Penn State Extension cautions that weed and feed products containing pre-emergent herbicides should not be used in areas where lawn seeding is planned, as they prevent grass seed germination the same way they prevent weed seed germination. The convenience is simply not compatible with a seeding plan.
Most pre-emergent herbicides also require a waiting period of eight to sixteen weeks after application before an area can be safely seeded — a window that pushes well into summer and past the point where cool-season grasses can establish successfully before heat sets in. Spring pre-emergent use and spring seeding are, in practical terms, mutually exclusive.
If weed pressure is a concern, the better path is to focus on establishing a thick, competitive stand of grass first. University of Minnesota Extension notes that a vigorously growing, dense lawn is the best defense against weeds — thin or weak turf is what creates the openings weeds exploit. Seed now, establish well, and address remaining weed pressure with post-emergent options later once your new grass has matured.
If seeding is on your spring checklist, set the weed and feed aside, choose a straightforward slow-release fertilizer, and let your Turf Mix do its job unimpeded.
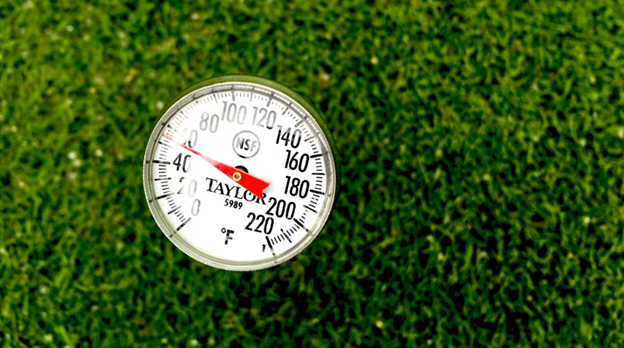 Photo courtesy of USGA
Step 4: Don't Rush the Seed — Wait for Consistent 55°F Soil Temps
If your lawn has bare patches, thin areas, or sections that came through winter looking rough, overseeding is an important part of the spring recovery. But this is the step where patience pays the biggest dividends — and where skipping ahead costs the most.
Grass seed does not respond to your schedule. It responds to soil temperature. Most cool-season grasses, such as Kentucky bluegrass, fine fescue, and perennial ryegrass, require soil temperatures between 50°F and 65°F for germination. Below that range, seed lies dormant. It does not die immediately, but it sits in the soil exposed to disease pressure, moisture fluctuation, and hungry birds — none of which improve your chances of a successful stand.
What most homeowners don't realize is that just because the air is 75°F, it doesn't mean the soil is 75°F. Soil acts as an insulator. Achieving soil temperatures in the 50 to 65°F range requires sustained air temperatures of about 10 degrees warmer over an extended period. A warm week in March does not mean your soil is ready. One inexpensive soil thermometer, available at any garden center, eliminates the guesswork entirely. Measure at a two-inch depth in the morning before the sun has had time to warm the surface.
The key word is consistent. A single warm afternoon that briefly pushes soil temps to 55°F is not the signal. You want several consecutive days of readings at or above that threshold before you put your Turf Mix down. Seeding too early can be risky — seeds planted below the ideal soil temperature window face increased risk of rot, disease, and loss to birds. If it's too cold, seeds will lie dormant; if it's too hot, they can dry out before sprouting, and tough summer weeds can outcompete young grass.
Michigan State University Extension notes that for cool-season turfgrasses including Kentucky bluegrass, perennial ryegrass, tall fescue, and fine fescue, these conditions occur in both spring and fall in Michigan, with late summer to early fall generally producing the best results for seeding. If your bare spots are significant, or if you're considering a more substantial renovation, fall is almost always the superior window. Spring seeding can absolutely succeed, but it demands patience and the right timing.
When you do seed, use the ground preparation that your dethatching and aeration work has already started. Ensure good seed-to-soil contact — small seeds like those in a fine fescue or bluegrass blend need to be in contact with the soil, not sitting on top of thatch or dry organic debris. Keep the seedbed consistently moist through germination, which typically takes 7 to 21 days for cool-season species depending on temperature and variety.
Putting It All Together: A Practical Spring Timeline
The steps above work best when followed in sequence, and the whole process is more manageable when mapped to what the lawn and soil are actually doing:
When the ground is workable and not frozen — Collect soil samples and submit to your local extension lab. This can be done as early as March in most Midwest locations.
After your first or second mow — Dethatch or core aerate if needed. The lawn is actively growing again and can recover from the mechanical stress. Apply any lime or sulfur amendments identified by your soil test at this time as well.
After your second mow, with consistent soil temps approaching 55°F — Apply your first fertilizer application at one pound of actual nitrogen per 1,000 square feet, using a slow-release product.
Once soil temperatures have held consistently at or above 55°F for several days — Overseed thin or bare areas with your Turf Mix, ensuring good seed-to-soil contact. Keep the seedbed moist through germination.
The instinct to get out early and do something is understandable, and it is not wrong. Raking debris, cleaning up winter damage, assessing problem areas — all of that is productive and appropriate as soon as the ground allows. But the most impactful decisions — when to fertilize, when to seed — belong to the soil thermometer, not the calendar. A lawn that wakes up in the right order, supported by what it needs based on a soil test, is a lawn that spends the rest of the season ahead of its problems rather than catching up to them.
Browse our Turf Mixes and lawn care resources to find the right products for your spring renovation this season.
Sources
- University of Minnesota Extension. Soil Testing for Lawns and Gardens. https://extension.umn.edu/managing-soil-and-nutrients/soil-testing-lawns-and-gardens
- Michigan State University Extension. Soil Testing Instructions Using MSU Extension's Home Lawn and Garden Soil Test Mailer. https://www.canr.msu.edu/news/soil_testing_instructions_using_msu_extensions_home_lawn_and_garden_soil_te
- Oklahoma State University Extension. Soil Testing, The Right First Step Toward Proper Care of Your Lawn and Garden. https://extension.okstate.edu/fact-sheets/soil-testing.html
- Penn State Extension. Lawn Management Through the Seasons. https://extension.psu.edu/lawn-management-through-the-seasons
- LawnStarter. When to Dethatch Your Lawn. https://www.lawnstarter.com/blog/lawn-care-2/when-to-dethatch-lawn/
- University of Wisconsin-Madison Division of Extension. Spring Lawn Fertilizing Guidelines. https://hort.extension.wisc.edu/2025/04/28/spring-lawn-fertilizing-guidelines/
- University of Minnesota Extension. Fertilizing Lawns. https://extension.umn.edu/lawn-care/fertilizing-lawns
- Illinois Extension. Fertilizing Your Lawn. https://extension.illinois.edu/lawns/fertilizing-your-lawn
- Plant for Success. The Importance of Soil Temperature in Your Lawn. https://plantforsuccess.com/soil-temperature-lawn/
- Green Meadow Lawn Care. When Does Grass Seed Germinate? Air Temp vs. Soil Temp. https://blog.greenmeadowlawncare.com/when-does-grass-seed-germinate-air-temp-vs-soil-temp
- Barenbrug. The Perfect Temperature for Lawn Seed Germination. https://www.barusa.com/homeowner/challenges-solutions/perfect-temperature-lawn-seed-germination-what-every-homeowner
- Michigan State University Extension. Establishing a New Lawn Using Seed. https://www.canr.msu.edu/resources/establishing_a_new_lawn_using_seed_e2910